27 Jan 3D Printing Repair: Use Your Printer to Fix Everything
With a 3D printer, household items breaking doesn’t have to be an issue. Check out these 3D printing repairs for all manner of home emergencies
Print Your Troubles Away

While many people think of 3D printing as being used to make toys, sculptures, or non-functional devices, it’s also possible to use 3D printing techniques to replace and fix existing objects. There are even large online communities dedicated to the creation and dissemination of useful 3D prints.
In the following brief guide, we’ll discuss what types of things have been printed, how you can get started, what tools you should use, how to make your prints look smooth and finished, tips and tricks for printing useful things, legal and health questions, as well as some examples of successful projects.
What Can Be Fixed?
You might have heard that 3D printed parts are good for rapid prototyping, but they can also help you around the house when you need the “perfect” part to fix that thing you’ve never gotten around to fixing.
So the immediate question is, what types of fixes can be 3D printed? And the immediate answer is, a lot of things! Everything from curtain rod mounts to leaky garden hoses to an ice cream maker lid to refrigerator clips to car brake line clips can and has been 3D printed.
There are really few limitations to what 3D printing can do as long as the application doesn’t encounter extremely high temperatures or excessively heavy loads (when most filaments are concerned).
Getting Started

Replacing a specific broken part or designing your own part might seem like a daunting task. Luckily, there are several things you can do for free that will get you fixing things in no time at all.
One of the best places to start is to join a website that has groups or sections for household models. While you can certainly design things yourself using a modeling program like Autodesk Fusion 360 or TinkerCAD, it’s often easier to see what others have created to try these fixes out first.
What Are Others Doing?
- 3D Printing Useful Things (Facebook): This Facebook group has over 37,000 members and is a particularly active 3D printing group. While you won’t get information about how to print objects here, there are many prints along with links to STL files that you can try out for yourself.
- Thingiverse: Thingiverse tends to be a good website for finding useful prints. However, to filter out the other types of prints, search within their household subcategory for useful prints like this Secret shelf by Tosh, depicted above. Conveniently, Thingiverse posts generally give basic print settings that help you get started with printing the object as well as some additional information about how to orient an object for ideal printing.
- Hackaday: This project on Hackaday follows a maker who fixes devices around the house from the whimsical to the functional. In addition, the projects are all posted on Thingiverse.
What You Need
Ready to start repairing? First, you’ll need to equip yourself with the tools and knowledge for the task.
Tools
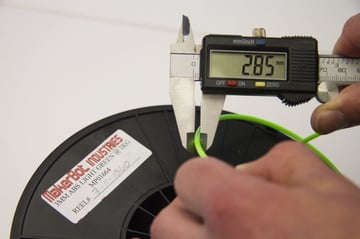
In order to model a customized part to fix something, you’ll need a few tools of the trade. While it’s certainly possible to scan your parts, 3D scanners can often be several hundreds of dollars and don’t always give the most accurate dimensions for a final functional part. Therefore, the most accurate way to print a customized part is to use measurement tools and model your own part in 3D modeling software.
- Calipers: A pair of calipers is quite helpful for measuring the critical dimensions of an object since they can measure length, inside diameter, outside diameter, and depth of holes with ease.
- Protractor (digital): Many objects will not simply be a square or rectangular object and may contain angular parts that need to be designed within a tight tolerance. A digital protractor can help give you an idea of what angles are used on an object in order to recreate the object as a 3D model.
- 3D scanner (optional): 3D scanners allow for an individual part to be scanned and directly converted into a 3D file. Unfortunately, most consumer-grade 3D scanners don’t have a resolution better than 0.5-1 mm, therefore, extremely small parts may not scan well. Additionally, the tolerance on your parts will be off by around as much as a whole millimeter, which may be unacceptable in a functional application.
Knowledge
Once you’ve identified the part you’d like to replace and you’ve decided that you can’t find any existing file to print, you should take a look at these Instructables, as they’ll give a general overview of the process of creating a 3D printed replacement part and the types of considerations you should take into account.
In general, there are four areas that you should consider when designing your part:
- Material: Which plastic would be best for your fix? To determine this, you should ideally try to use the same plastic that the original part was made of. When this isn’t possible, taking a look at the advantages and disadvantages of each type of filament so that you can choose one that works well for your application.
- Tolerances: When you’re creating a part that needs to fit an existing device, you should consider how much tolerance you give for your modeled part. For example, most 3D printed objects need around 0.4-0.8 mm of “extra clearance” in order to fit well with other objects. This depends on the application and on how precise your 3D printer is with printing, however, this is a generally good range to start at to ensure proper fit. If you need exceedingly precise dimensions, you should consider using a 3D printing service. If you’re interested in this route, you could check out Craftcloud, the 3D printing and price comparison service from All3DP, which can save you money when you’re ready for your next project.
- Other replacements: One thing to consider before printing your fix is whether or not it’s worth printing the fix at all. Oftentimes, extremely small metal parts (like fasteners and threaded rods) shouldn’t be 3D printed due to the fine resolution and lack of strength that follows plastic parts in general. Additionally, small metal parts may actually be cheaper if they can be easily purchased at a local hardware store. Keep in mind that for fixes, both purchased parts and 3D printed parts can be integrated together to create a final part.
- Finding premade models: Finally, if you’re trying to fix a common part, you should consider directly trying to find a 3D model of the part. For example, many Ikea parts can be found online. For more general parts, you can use a parts company like McMasterCarr and Grainger, which publish the 3D models for most of their parts online.
Legal & Health Questions
Before you make your own fixes, you need to consider a few things first. Although no one would consider 3D printing a bust of Thanos to present any legal issues, 3D printing fixes for your home can present some legal risks and potential challenges.
Answers from Insurance Agents
We contacted two insurance agents, Ryan Smith of the LePage Agency in Missouri and Andrew Goff of Farmers Insurance in Pennsylvania, and asked them a few questions regarding 3D printing and insurance issues. The questions and their paraphrased answers are given below.
HAVE YOU ENCOUNTERED 3D PRINTING WITHIN INSURANCE CLAIMS BEFORE?
Both of the agents said that they had not, however, due to the nature of 3D printing being a new area, damage caused by 3D printed fixes likely wouldn’t be covered under a standard homeowner’s policy. The insurance company in theory could go after a company that produces inferior 3D printing material if that was the ultimate cause of a failure, but this is uncharted territory and therefore would be decided on a case-by-case basis.
IF I CREATE A PART AS A FREELANCER IN ORDER TO FIX A POTENTIALLY INSURABLE OBJECT IN A HOME, WHAT PROTECTIONS WOULD I NEED TO RUN SAID BUSINESS?
The homeowner would need general liability insurance as well as product liability coverage for an object to be covered. In addition to that, the company selling said products would need to be approved by underwriting staff in the company for the object to be covered.
WHAT SHOULD MY EXPECTATION BE IF I FIX SOMETHING IN MY HOME? WILL IT BE COVERED IF SOMETHING HAPPENS?
This depends a great deal on if you’re talking about the object itself being covered or damage caused by the object being covered. If you’re talking about the object being covered, the answer is a potential “yes”, however, you’d need to discuss it with your insurance agent. If you’re talking about damage caused by a 3D print, that would most likely not be covered under a standard insurance agreement, although this is a new area that hasn’t been tested yet.
Potential Health Issues
To learn more about potential safety risks for home 3D printing fixes, we further interviewed Michael E. Goldschmidt, director of Healthy Homes Partnership. This agency produces education for home safety as it relates to home fixes and general home and occupant health.
WHAT ARE THE BIG RISKS IN TERMS OF 3D PRINTING FIXES FOR YOUR HOME?
The big risks include the printing itself of an object that could cause health problems, as detailed in recent articles on 3D printing generating particulates. Volatile organic compounds (VOCs) as well as ultra fine particles (UFPs) are the main issues when creating a 3D printed object if the printer doesn’t have adequate ventilation. This goes for the two most common types of printers (SLA and FDM).
The director recommends that printers be vented to the outdoors, if possible, and that they not be used in places with stagnant air flow, such as in basements and other areas. In an ideal world, the printer itself should also be UL certified (or equivalently certified in other countries) to avoid fires and other safety hazards.
WHAT ABOUT RISKS FOR USING THE PRINTS THEMSELVES?
Given that 3D printers can deposit small amounts of lead into prints (particularly if the filament isn’t sourced from a reliable vendor), it’s best to stay away from printing objects that will come into contact with food or potable water. While the levels may not be high in 3D printers, the World Health Organization notes that “there is no known ‘safe’ blood lead concentration,” especially for young children. Otherwise, printing failures could be a source of harm or damage in certain situations.
Tips & Tricks
Once you’ve started printing, you should consider the following tips for getting the best fixes:
- Start by printing a “test” version using extremely low infill (1-5%) or print just an important dimension to check for fit.
- Don’t be afraid to do some post-processing on your print.
- Sanding a part to fit is often necessary when the dimensions aren’t quite right.
- Finishing a part with acetone vapor smoothing for ABS or using modeling clay finishing for PLA can often give your print the finish it needs to look perfect.
- Print an extra if the part is likely to break.
- Water tightness can be achieved with post-processing and tuned settings.
- Print orientation matters (i.e. print along the axis that will take the highest load).
Example Builds
Here are some example home 3D printing fixes we’ve successfully printed and used:
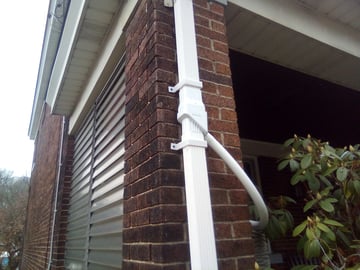
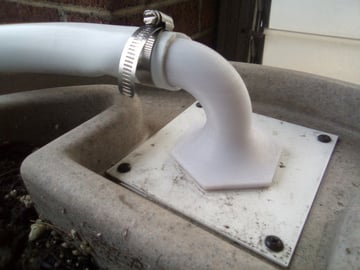
- Rain barrel connector: This custom connector allows water to flow from a downspout diverter into an enclosed rain barrel. This print required a lot of tolerance work, as the parts contain threaded pieces that require a good fit to be watertight. Additionally, a good choice of PETG was necessary since this was to be used outside.
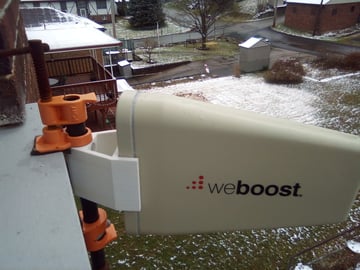
- Cell phone booster mount: Normal installation costs for a cell phone booster are in the neighborhood of several hundred dollars. This removable cell phone booster mount was printed in PETG since it would need to be mounted outside for maximum effectiveness.
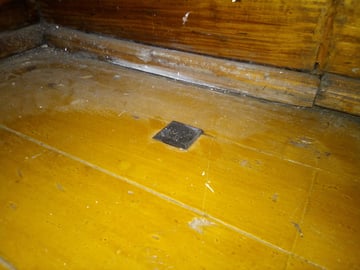
- Wood floor plug: Sometimes you need to plug a hole in the floor to prevent valuables from falling down into the floor never to be seen from again. This print definitely required a few test prints to ensure that the fit was just right.
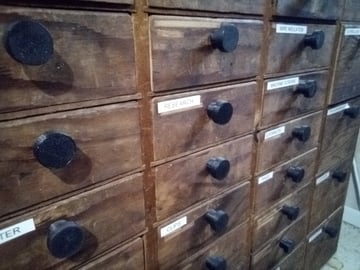
- Workshop drawer pulls: These drawer pulls have lasted four years and have been a great addition to the organizer. Printing these along a particular axis helped strengthen them for long-term use.
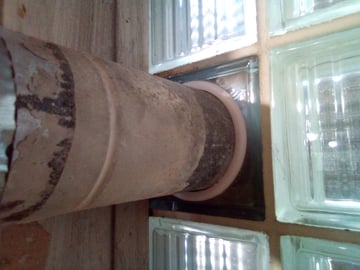
- Glass block dryer vent: This dryer vent fitting was created to prevent heat from leaking out from a basement. Since the glass block had a poorly-drilled hole, printing a custom solution was ideal to ensure air-tightness.
Other practical prints we’ve produced (for inspiration):
- Lamp rods
- Downspout clamps
- Shade hanger offsets
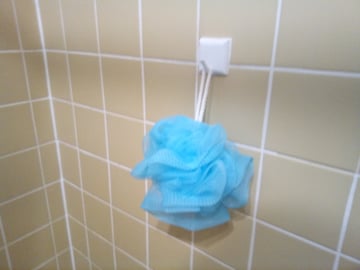
- Shower hooks
(Lead image source: 3BL Media)
Sorry, the comment form is closed at this time.